Six String Fingerpicking Courses and Lessons

Advanced Percussive Techniques of John Mayer (Guitar Lesson)

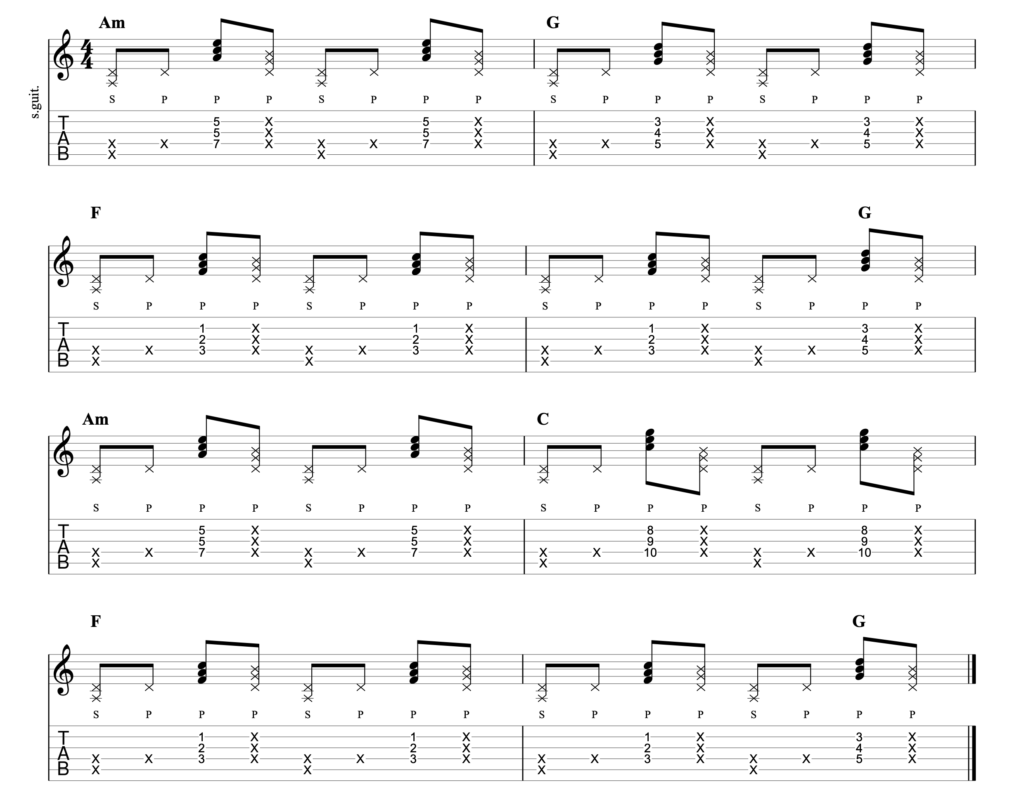
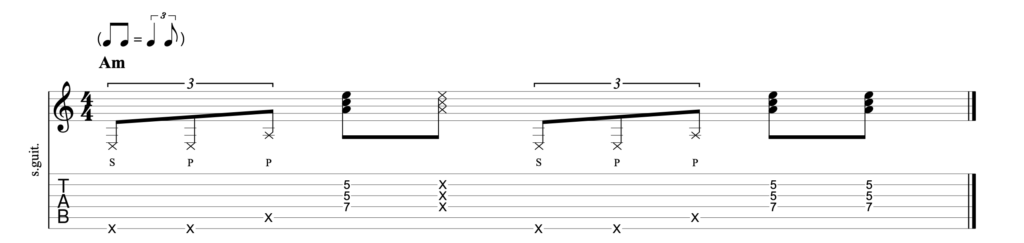
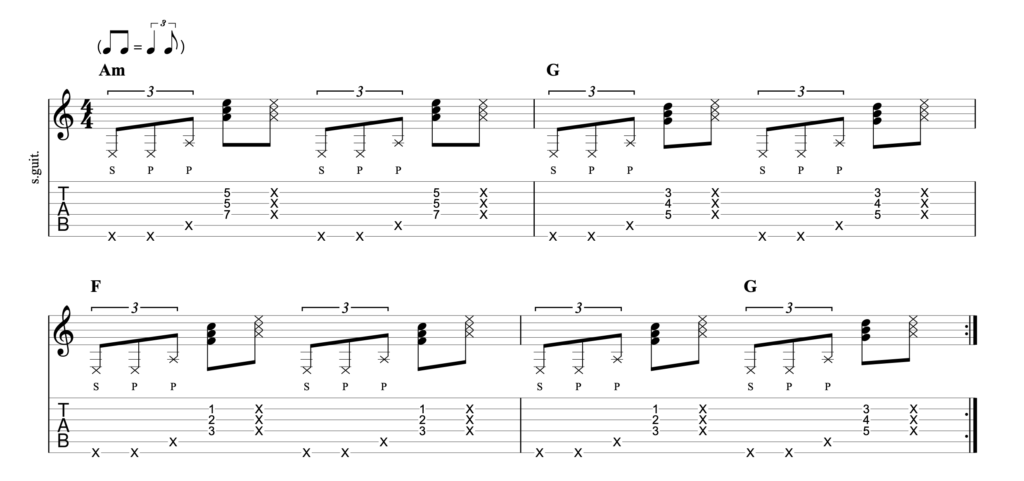
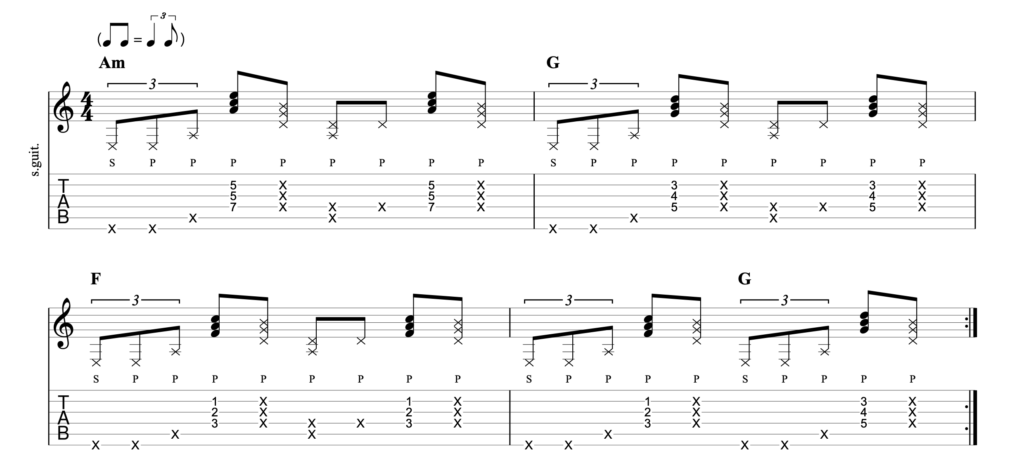
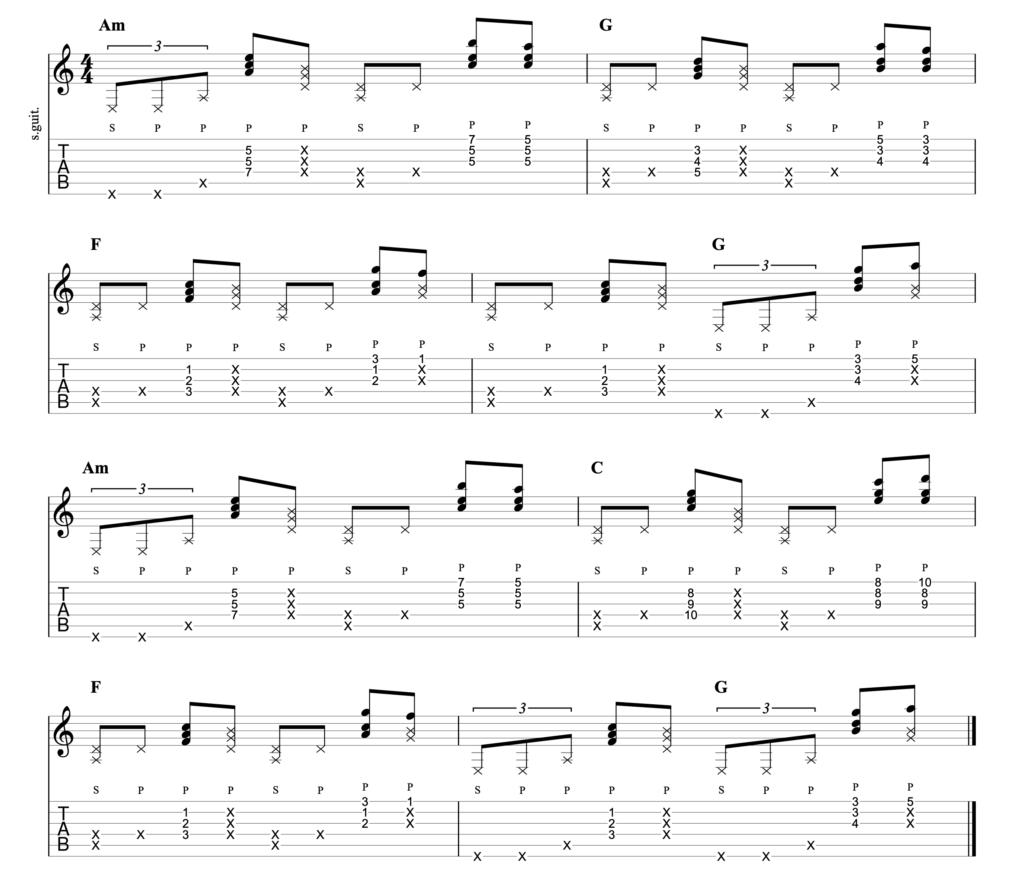
In this lesson we’re going to be learning two of John Mayer’s advanced percussive techniques that he uses in his live performance of Neon.

Both of these techniques are very subtle, very cool and really quite advanced. Expect some frustration, and a very sore and very red thumb.

The main goal of this lesson is of course to learn the techniques, but to also get them into your own playing – for you to get creative with them and to write something of your own that uses them.

Let’s get straight on with the lesson.

Neon percussive techniques

JOIN THE MAILING LIST

Get 25% off tabs, try the courses for free and get exclusive lessons when you join the mailing list.

Join The Mailing List
Get the Tabs


Two Percussive Techniques of John Mayer


Technique 1 – Percussive 8th Notes

Step 1

The first advanced percussive technique is probably the easier of the two but, having said that, it’s likely going to take some work to master.

You can play this technique straight or with a shuffle feel.

It’s best to really master it on just one chord before trying to move it around the neck.

Step 2

Once you’re OK applying this advanced percussive technique on one static chord, you can then start to move it around the neck a little.

All I’ve done here is add the technique to a very simple/common chord progression in the key of A minor.

You’ll hear straight away just how rhythmical and music it sounds.

So that’s the first technique! At the end of the lesson I’ll be showing you another way of making this even more musical. But now, let’s move on to the second technique.

40% OFF - The Ultimate Bundle

Want to be a truly great player? Get HUNDREDS of fingerstyle video lessons for an incredible 40% OFF! Take advantage of this brilliant offer and learn absolutely everything you need to know about fingerpicking.


Technique 2 – The Percussive Triplet

Step 1

This next advanced percussive technique requires a lot of control in your thumb. It’s very difficult at first but with a bit of work you will get it down.

The technique is just 3 steps:

1. Slap your thumb into the muted low E string, 2. Push through and pop the E string, and 3. Push through and pop the A string.

All three steps are executed solely with your thumb.

Just as for the first technique, you really must master this first in isolation before thinking of doing anything else with it.

Tabbed out it looks like this:

Step 2

Once you have that feeling comfortable, then add a simple Am chord.

Step 3

Then you can move this advanced percussive technique through a simple chord progression.

Play like the greats!

Break through the intermediate barrier and become the advanced fingerpicker you always wanted to be.

Join the course today and master the skills you never thought you could!

Complete Guide to Fingerstyle Guitar Advanced


Putting It All Together

The next thing you want to do with the two advanced percussive techniques is to tie them both together.

Here, we go through the same progression as last time but this one uses both the techniques that we’ve covered in this lesson. If you’ve mastered both the techniques then this shouldn’t involve too much of a struggle. Have some fun with it!

Bonus Lesson

No matter what you learn in any guitar lesson you can always take it further, and I believe that’s how great players end up as great players.

I can’t encourage you enough to take what I’ve taught your here and build upon it on your own. It’s truly essential to becoming an individualistic player.

One way to take this lesson a little further is to add in some of the notes of the scale to the chords, just to make them a little more colourful. This is very reminiscent of what Hendrix would do.

Here’s the A minor scale just on the high e string:

You can use those notes to add extensions to your chords. Play around with it and see what you can come up with.

Here’s an example that you can learn and have some fun with:

So there you go, two very advanced percussive techniques for you to play around with. I really hope that you’ve enjoyed this lesson.